Table of Contents
Quick Start
In this guide, we are going to use the ZeroAuth zkLogin Android SDK to integrate zkLogin into an Android application. From installation to usage, this guide will cover everything you need to know to get started.
But before we begin, assumptions are made about your knowledge of Kotlin or Java, Android development, and zkLogin.
Prerequisites
This guide assumes you have a basic understanding of Android development and Kotlin or Java.
It also assumes you have a conceptual understanding of zkLogin, but a deeper understanding is not required. However, if you are not familiar with zkLogin, you can read more about it in the zkLogin section.
If you understand the above, you are ready to get started, but before we do, you must have the following:
- OAuth client credentials from an OAuth provider. This is required to authenticate your application with the OAuth provider. You can obtain these credentials by registering your application with the OAuth provider. For this guide, we will use Google, but the process is similar for other providers.
- A remote salting service. ZeroAuth zkLogin Android SDK is designed to work with remote salting services. It defaults to the Mysten Labs salting service if not specified, but it can be configured to work with other salting services. For this, your client credentials must be whitelisted by Mysten Labs.
- A remote proving service. Just like the salting service, ZeroAuth zkLogin Android SDK is designed to work with remote proving services. It defaults to the Mysten Labs proving service if not specified, but it can be configured to work with other proving services. For this, your client credentials must be whitelisted by Mysten Labs.
Register (d)app
In your browser, navigate to the Google Cloud Console. If you are not already signed in, sign in with your Google account:
- Click on the project drop-down and select or create the project you want to use for your application.
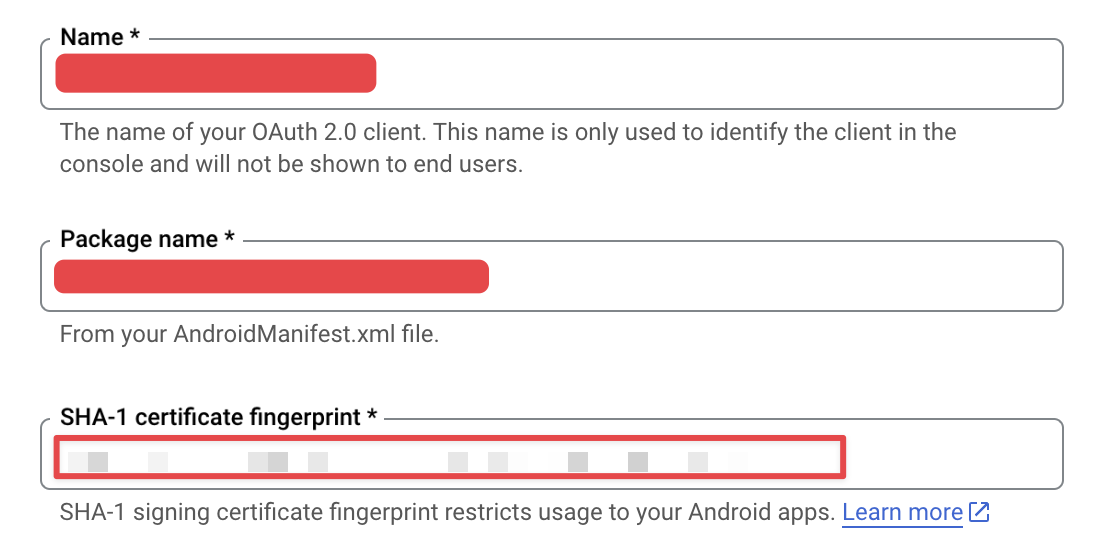
- Under the API & Services section, click on the Credentials tab. If you have not already created any credentials, click on the Create credentials button and select OAuth client ID of type Android.
- Fill in the form with the required information. You will need to provide the package name of your application and the SHA-1 fingerprint of the signing certificate.
TIP
To get the SHA-1 fingerprint of your signing certificate, you can use the following command:
keytool -list -v -keystore zero.keystore
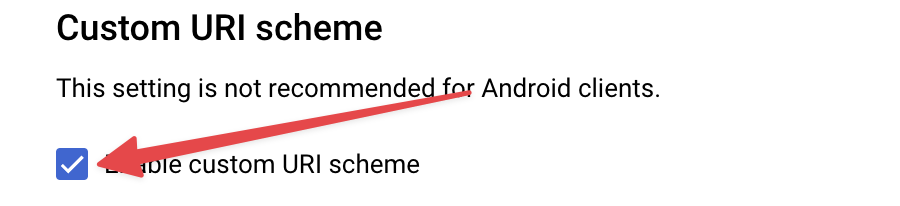
- Enable Custom URI scheme and add the scheme to the OAuth client ID. The scheme is used to redirect the user back to your application after they have authenticated with Google.
The created OAuth client ID should look like this:
PREFIX.apps.googleusercontent.com, where PREFIX is an alphanumeric string unique to your client ID.
Installation
WARNING
ZeroAuth zkLogin Android SDK is currently in beta stage, and the API is subject to rapid changes until the first stable release. Please report any issues you encounter. Currently only snapshot versions are available. Stable versions will be available soon.
To add ZeroAuth SDK to an Android project, you must add a dependency to your build.gradle as follows:
dependencies {
    implementation("xyz.mcxross.zero:zero-android:<version>")
}
TIP
The ZeroAuth Android SDK offers two library flavors to cater for different development needs:
- Release Flavor: This flavor is optimized for production environments.
- Debug Flavor: This version is tailored for development and testing phases. It includes additional logging to aid developers in troubleshooting and refining the ZeroAuth integration within their projects.
Configuration
To use the ZeroAuth Android SDK, you must add the following configuration to your AndroidManifest.xml file:
<application>
    <activity android:name="xyz.mcxross.zero.oauth.RedirectUriReceiverActivity">
        <intent-filter>
            <action android:name="android.intent.action.VIEW" />
            <category android:name="android.intent.category.DEFAULT" />
            <category android:name="android.intent.category.BROWSABLE" />
            <data android:scheme="<place-your-scheme>"
                  android:path="/oauth2redirect"
            />
        </intent-filter>
    </activity>
</application>
This configuration is required to handle the result of the zkLogin process.
In your app's build.gradle file, you must also add the following configuration to enable the use of the zklogin scheme:
android {
    defaultConfig {
        manifestPlaceholders = [
            zeroAuthRedirectScheme: "<place-your-scheme>/<path>"
        ]
    }
}
Usage
Result launcher
In order to receive the result of the zkLogin process, you must register a result launcher in your activity. This is where the result of the zkLogin process will be delivered, typically a ZKLoginResponse object.
val zkLoginGoogleResultLauncher =
    registerForActivityResult(ActivityResultContracts.StartActivityForResult()) { result ->
      if (result.resultCode == Activity.RESULT_OK) {
        // Handle the login response
      }
    }
ActivityResultLauncher<Intent> zkLoginGoogleResultLauncher =
        registerForActivityResult(
                new ActivityResultContracts.StartActivityForResult(),
                new ActivityResultCallback<ActivityResult>() {
                    @Override
                    public void onActivityResult(ActivityResult result) {
                        if (result.getResultCode() == Activity.RESULT_OK) {
                            // Handle the login response
                        }
                    }
                }
        );
Initialize the SDK
The next step is to initialize the SDK. This is done by setting the required configuration parameters with a ZKLoginRequest object and passing it to the zkLogin callable.
val zkLoginRequest = ZKLoginRequest(OpenIDServiceConfiguration(Google(), clientID = "YOUR_CLIENT_ID", redirectUri = "YOUR_REDIRECT_URI"))
ZKLoginRequest zkLoginRequest =
        new ZKLoginRequest(new OpenIDServiceConfiguration(new Google(), "YOUR_CLIENT_ID", "YOUR_REDIRECT_URI"));
TIP
The redirectUri must match the one placed in the AndroidManifest.xml file.
This object encapsulates a zkLogin request. It facilitates the configuration of an OAuth provider and the definition of a salting or proving service. It at least requires an OpenIDServiceConfiguration object for the OAuth provider. This is finally passed to the zkLogin callable to generate an intent which should be used to launch the ZKLoginManagementActivity which orchestrates the OAuth flow, managing the outcomes adeptly and relaying the result—usually a ZKLoginResponse upon success or null if failed—back to your calling activity.
There are a few ways to access the zkLogin callable depending on your preferred style of coding and the language you are using:
You can then either use the zkLogin infix extension function available on the Context class of your activity:
val intent = this@MainActivity zkLogin zkLoginRequest
OR:
Pass it to a top level function:
val intent = this@MainActivity zkLogin zkLoginRequest
OR:
Create a DefaultZKLoginService instance and call the zkLogin method:
val zkLoginService = DefaultZKLoginService(this@MainActivity)
val intent = zkLoginService.zkLogin(zkLoginRequest)
DefaultZKLoginService zkLoginService = new DefaultZKLoginService(this);
Intent intent = zkLoginService.zkLogin(zkLoginRequest);
Trigger zkLogin flow
The next step is to trigger the zkLogin flow. This is done by launching the ZKLoginManagementActivity with the intent generated above:
zkLoginGoogleResultLauncher.launch(intent)
zkLoginGoogleResultLauncher.launch(intent);
The complete code is as follows using a button click listener:
class MainActivity : AppCompatActivity() {
  private val zkLoginGoogleResultLauncher =
    registerForActivityResult(ActivityResultContracts.StartActivityForResult()) { result ->
      if (result.resultCode == Activity.RESULT_OK) {
        val data: Intent? = result.data
        // Handle the login response
      }
    }

  override fun onCreate(savedInstanceState: Bundle?) {
    super.onCreate(savedInstanceState)
    setContentView(R.layout.activity_main)

    val zkLoginRequest = ZKLoginRequest(OpenIDServiceConfiguration(Google(), clientID = "YOUR_CLIENT_ID", redirectUri = "YOUR_REDIRECT_URI"))

    val intent = this@MainActivity zkLogin zkLoginRequest

    findViewById<Button>(R.id.button).setOnClickListener {
      zkLoginGoogleResultLauncher.launch(intent)
    }
  }
}
public class MainActivity extends AppCompatActivity {

    private final ActivityResultLauncher<Intent> zkLoginGoogleResultLauncher =
            registerForActivityResult(
                    new ActivityResultContracts.StartActivityForResult(),
                    new ActivityResultCallback<ActivityResult>() {
                        @Override
                        public void onActivityResult(ActivityResult result) {
                            if (result.getResultCode() == Activity.RESULT_OK) {
                                Intent data = result.getData();
                                // Handle the login response
                            }
                        }
                    }
            );

    @Override
    protected void onCreate(Bundle savedInstanceState) {
        super.onCreate(savedInstanceState);
        setContentView(R.layout.activity_main);

        ZKLoginRequest zkLoginRequest =
                new ZKLoginRequest(new OpenIDServiceConfiguration(new Google(), "YOUR_CLIENT_ID", "YOUR_REDIRECT_URI"));

        DefaultZKLoginService zkLoginService = new DefaultZKLoginService(this);
        Intent intent = zkLoginService.zkLogin(zkLoginRequest);

        Button button = findViewById(R.id.button);
        button.setOnClickListener(new View.OnClickListener() {
            @Override
            public void onClick(View view) {
                zkLoginGoogleResultLauncher.launch(intent);
            }
        });
    }
}
Or using Jetpack Compose:
class MainActivity : AppCompatActivity() {
  private val zkLoginGoogleResultLauncher =
    registerForActivityResult(ActivityResultContracts.StartActivityForResult()) { result ->
      if (result.resultCode == Activity.RESULT_OK) {
        val data: Intent? = result.data
        // Handle the login response
      }
    }

  override fun onCreate(savedInstanceState: Bundle?) {
    super.onCreate(savedInstanceState)
    setContent {
      val zkLoginRequest = ZKLoginRequest(OpenIDServiceConfiguration(Google(), clientID = "YOUR_CLIENT_ID", redirectUri = "YOUR_REDIRECT_URI"))

      val intent = this@MainActivity zkLogin zkLoginRequest

      Button(onClick = {
        zkLoginGoogleResultLauncher.launch(intent)
      }) {
        Text("Login With Google")
      }
    }
  }
}
Next Steps
Congratulations! You have successfully integrated ZeroAuth zkLogin Android SDK into your Android application. You can now use zkLogin to authenticate users and do transactions.
You can find a demo application in the ZeroAuth repo